Carved Golf Balls
 Getting ready for an upcoming carving class that #2 and I will be attending, I was looking around for carving info on the web. I wandered onto the forums at Woodcarving Illustrated where I found a golf ball carving tutorial by Gene Messer.
After some more searching around the net, I ended up on YouTube where I found that Gene has recorded lots of video tutorials, including a series on carving and painting a golf ball.
Here are links to the golf ball series to make it easier to find:
- Carving A Face On A Golf Ball Part 1
- Carving A Face On A Golf Ball Part 2
- Carving A Face On A Golf Ball Part 3
- Painting The Carved Golf Ball Part 1
- Painting The Carved Golf Ball Part 2
- Painting The Carved Golf Ball Part 3
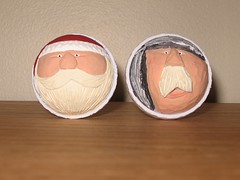
The ball on the right is the one I carved after reading the tutorial. It was painted after I’d found Gene’s videos. After thinking about it and watching some of Gene’s Santa carving videos, I came up with the Santa face on the left.
Saturday November 22, 2008 · Permalink
Projects posted at LumberJocks
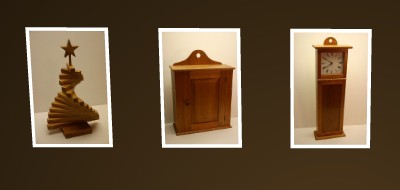
I’ve posted three projects over at my LumberJocks project page.
Left to right they are Lollipop Tree, Shaker Wall Cabinet in Cherry, and Shaker Wall Clock in Cherry
Tuesday December 4, 2007 · Permalink
Cub Scout Bird House
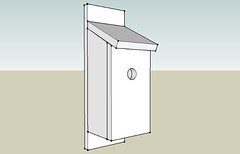
Here is a SketchUp plan for small bird house that will help a Cub Scout meet one of their Bear requirements (5b in Sharing your World with Wildlife).
The bird house is made from standard 1×6 lumber, using less than 7 feet per bird house. The front, back and top are all full width 1×6, but the sides and bottom are ripped to 4 inches in width. The SketchUp file includes a dimensions layer you can turn on to see the major dimensions.
You can either nail on the top or add a small hinge to make it easier to clean out (like our Bears did). When I made the kits up for our Bears, I took the time to pre-drill holes on the front, back, and sides to make it easier for them to get the houses together. Each was assembled with 1-1/2” brads.
Tuesday November 28, 2006 · Permalink
Making a hot wire foam cutter
When presented with the unique opportunity to slice 24 4-inch styrofoam balls in half, what would you do?
After looking at one of them, I decided that there wasn’t any way in the world that I was going to cut them on the bandsaw. There’s enough sawdust in the shop as it is, without adding styrofoam dust to it.
I’d remembered seeing a hot wire foam cutter on the MAKE: blog so I went looking for how to make my own hot wire cutter. The MAKE: blog pointed to flywoodkb’s hot wire foam cutter on instructables so I started with that as my basis.
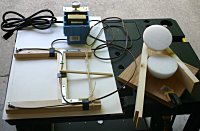 Here’s what I came up with. Visit my hot wire foam cutter set on Flickr for more pictures.
Instead of the CD case project box, I just used a three wide plastic outlet box from HD to hold the dimmer and transformer. I cut the tabs off the sides since they were just in the way. Since I had some 1-by material around, I used that to make a small bow for holding the cutting wire. Twine around the top is used to tension the wire and can be adjusted as the wire heats and lengthens.
Since I was tasked with cutting foam balls in half, I made up a jig to help hold them in place and guide the wire at the right height. It’s nothing more than two pieces of 1-by two inches in height placed at a small angle on a board. This allowed me to hold the ball in place with one hand and while the other hand held the bow so the wire would ride the 1-by material and cut a nice clean line.
Tuesday June 27, 2006 · Permalink
Are you a LumberJock?
If you are a LumberJock (or just aspire to be one like I do) then you should visit LumberJocks. LumberJocks is a growing website that gives the registered “Jocks” a place to post descriptions of their projects along with few photos. Other “Jocks” can rate the projects and leave weblog style comments and questions on the projects they visit.
LumberJocks is still under active development and has recently added forums for discussions amongst the members. There’s also a LumberJocks Blog that you can watch for announcements concerning the site.
The whole LumberJocks site is very cleanly styled and well crafted. I’d guessed it was a Rails app even before scrolling to the bottom and seeing the Rails logo. LumberJocks makes very nice use of Ajax and Rails features to make the site a joy to use. I particularly like the float-over picture viewer used on the project pages; no extra windows popping up or back-buttons to contend with when reviewing the project photos.
Monday May 22, 2006 · Permalink
Window Bench in Google SketchUp
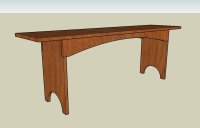 The window bench was built out of jatoba (Brazilian cherry) to fit below the picture window in our living room. It might be just a little too tall as a bench, but works great as a small table. The stretchers are screwed to the sides and the holes plugged. The top is secured by table top fasteners (z clips) in grooves cut with a biscuit joiner.
Wednesday May 3, 2006 · Permalink
Angled Footstool in Google SketchUp
I’ve been playing with Google SketchUp (like thousands of others).
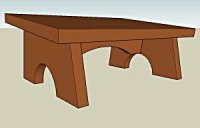 Here is a small angled footstool, sometimes sold as a nursing footstool, drawn in Google SketchUp.
The joinery is very simple, just two screws through each side into the brace, and four screws from the top, two into each side. All screws are covered with wood plugs. I built ours from oak, but any harder wood would work, cherry, jatoba, maple, ash, whatever matches your environment. Since it is somewhat shaker styled, you could even make it from poplar and milk paint it.
Not shown in the sketch (yet) are the small rubber feet that I inset into holes on the bottoms of the side pieces. I left the rubber proud of the hole by about 1/8” to keep the stool from sliding on the berber carpet. Other carpets may not be as slippery.
Dimensions are: top 14×10, highest point about 6 1/4”. There is a dimension layer in the sketch that you can turn on to see all the dimensions.
Wednesday May 3, 2006 · Permalink
My First Raised Panel Door
I made my first raised panel door this weekend. It was actually easier than I thought it would be.
I’ve been taking a series of woodworking classes at our local Woodcraft building Shaker inspired pieces with Glen Huey. Glen’s a great instructor, showing us how he makes the pieces in his shop. It’s nice seeing how he works to make each piece simply, and how many of the setups help to eliminate mistakes.
The door (about 14×19) used rails and stiles that were 2 1/4 inches wide with 1/4 inch mortices and a 3/8 inch deep dado 1/4 inch wide with haunched tenons.
The cutting sequence is actually quite simple:
- cut 1/4 inch wide mortice in the rails, they should end 3/8 inch from the end and from the mating rail edge
- cut 1/4 inch deep kerf 1 1/4 inches from each end of the faces of the rails
- cut 3/8 inch deep kerf 1 1/4 inches from the inside edges of the rails
- cut 3/8 inch deep kerf 7/8 inches from the outside edges of the rails (this is for the haunch)
- using a tenon cutting jig, cut the tenons on the rails to fit the mortices
- cut a 1/4 inch dado in the insides of the of the rails (first) and stiles (second), use the tenons to size the dados so haunch will fit securely in the rails
The raised panel was simple to make also. We were using a 5/8 inch panel so the raised panel stands proud of the frame (just an 1/8th inch).
Glen likes to use a 12 degree angle, so the edge of the panel is needs to be 3/16 inch to fit correctly in the dado. We used a zero clearance plate for the saw, then set the height of the blade so the outside edge of the blade’s tooth would just come through the panel by holding the panel above the blade as it was adjusted. We cut the end grain first and then with the grain. I was suprised by how much force it took to cut the end grain.
After raising the panel we reset the saw to square up the edges of the raised panel, shaving off just a fine 1/8th inch to clean up the edge. Just a little sanding later and we were able to glue up the frame and raised panel doors.
Monday March 27, 2006 · Permalink
Popular Woodworking and Shepherd Tool Company
Last Wednesday (25 Feb 2004) the editors and woodworkers of Popular Woodworking held an open house, shop tour, and infill plane building demonstration.
The evening opened with a nice dinner supplied by PW in their company lunchroom. I was pleasantly suprised by the turnout there were lots of woodworkers in attendence and we completely filled room. I'm bad at estimating crowds, but I'd guess there were 75+ people there. All of the woodworker/editors of PW were there to meet their readers and woodworking guests.
After dinner it was time for a quick tour of their new shop. Previously the PW shop was in the basement of an interesting old Art Deco building near the Xavier University campus. While the old shop was bigger it suffered from a lack natural lighting (the only windows were covered by grates and foliage). The new shop is smaller but had four giant windows where the editors have their handwork benches setup. They also gained a nice set of loading dock doors to make moving lumber and projects easier.
While we were touring the shop, the lunchroom was switched over for the presentation on building an infill plane by Doug Evans and Ben Knebel of the Shepherd Tool Company. After some computer problems (love that Windows 98) Doug started talking about infill planes while Ben got busy being funny and building their small chariot block plane.
It was truly amazing at how fast Ben can put a plane together. In less than two hours he had dovetailed the brass sides and steel sole together, added the infills and riveted them into place, draw filed the peened over dovetails, and beltsanded the sole and one side to a nearly finished state. When Ben and Doug say anyone can make their own chariot plane in just a few hours I can believe it now, since Ben spent a lot of his time joking and talking rather than strictly working on the plane.
While getting links for this article, I just found that Shepherd Tool now has a thumb plane kit that is only $69.95. Looks like a great way to try out making one of their planes and getting a great looking tool as part of the process.
I'm looking forward to going back and visiting in the PW shop if the plans work out for a couple of demonstrations work out like the PW editors would like.
Saturday February 28, 2004 · Permalink
Using a router fence with bearing bits?
Watching the Router Workshop yesterday, I found myself questioning why the hosts kept setting up a fence so that the bearing portion of the router was flush with the fence. A few minutes later I got my answer. Seems I probably wasn't the first person to ask them that question.
By setting the fence up flush with the router bit bearing you reduce the chance of slight variations in the edge getting telegraphed through the bearing and into the workpiece.
Monday January 19, 2004 · Permalink
